Saturday, February 27, 2016

Citrus Twist Kits DT | Project Life

Hey everyone!!

Ready for another Project Life spread of inspiration made with the Citrus Twist February 2016 kits?
Again, I'll keep it short and sweet. :) Enjoy!


This month's kit was my favorite since I'm on the DT. Trina, the owner of CTK designs her cards herself and they are now double sided and the design and colors were just gorgeous!!!!!


There you go! Now go create something if you can. :)

Marie

Friday, February 26, 2016

Citrus Twist Kits DT | Project Life

Hey everyone!

I just realized that I never showed you the rest of my Project life pages made with my February Citrus Twist Kit.  I'll keep it short and sweet and leave the photos speak for themselves since I'm so crazy busy (and sick) these days. Hope you don't mind!!


This was an attempt of creating a "christmas tree" with the labels and words. Notice the star and stem in enamel dots.


One of my favorite of the spread is this little pocket I created with papers and a tag.


Cute cute simple card design. Love it when I have space to write!


With the reflection, the letters seem a little bit weird, but in reality they are silver and when we look from the side there's a blue/pink shimmer. Suits the snow pictures really well.


There you go. ;)


Citrus Twist Kit's favorite: the small stamps. :) Perfect for a bit of extra stamping on the photos since I hate using my slick writers and my hand writing directly on the pictures, this saves the day (Ali Edwards does a far better job than me with the writing directly on the pictures -  had to say it.).


There you go. Come back soon for the following week with my February Citrus Twist kit.

Marie-Pierre

Thursday, February 25, 2016

Hip Kit Club DT | Father Daughter Dance

Hi everyone!

For this week I have another small 8x8 page I made to highlight a photo of my husband and daughters before they left to the father and daughter school danse.


I used the Hip Kit Club February 2016 Main kit, the February 2016 Project Life kit and the February 2016 Embellishment kit. I totally loved the papers this month. The hint of navy, the subtle flowers, the black and white and the very cheerful but soft colors.


Here you see a hint of color on the black and white paper. Just gorgeous combination. I added a touch of gold with some gold thread.  Shimelle's chipboard pieces are really fun to use. That Air balloon really grabbed my heart. :)


I thought the ephemera pack from Pink Paislee was really cute to pair with this Father-daughter dance photo because of the French flair to it. Ooh la la is NOT something we say in my family...even if we speak French. But we get the reference. ;)


The February Project life kit has a sticker booklet from Amy Tangerine which was very fun to use and look through and find little pieces here and there. :) I used that big journaling spot and also some little music notes.


The flower is from Shimelle's chipboard again and I added some gold thread in the middle with my sewing machine.


I also liked to used little navy blue touches. The title here. And that "family" sticker from the Amy Tangerine's sticker booklet.


VoilĂ ! :)
How is your Project Life album coming along? Are you sticking to a spread a week? Are you adding inserts like I do? I'd love to hear from you. :)

Marie-Pierre

Sunday, February 21, 2016

Pretty Little Studio DT | Hello Adventure

Hello everyone!

I'm here today to share a page I made for Pretty Little Studio.


I kept it very light with a white background and minimal embellishment.


Some blues and aquas and pops of reds.


I also found a pop of red on the packaging Of my products! Melissa does a really good job at designing the packaging so that you can USE it. On the whole Christmas collection there were Die Cuts that we could die-cut ourselves! I think that it is a very awesome touch.

I love love love this cute flair with the sailboat. Just adorable. I also love the transparency with the hearts. For now there's only the vellum with the hearts in the shop, but the clear should come...


The small blue letters are just great!! And that anchor sticker that i covered with some little label and word cut-out. Cute! :)


Some more layering of cute papers.


And here you can even see a velum tape. How cute is it??! Just the perfect addition.
Oh and that little metallic heart, I simply punched it out one of my scraps from my December album. :) I punched several actually. We can always use a metallic red heart, right?!


I finished by writing a quote I found on Facebook and adding some personal details to explain a tiny bit why I chose that quote and what's the link to the photos.... 

I know some of you will wonder how I wrote the quote. I used an Oblique Pen Holder and a NIKKO G with reservoir Nib. The Nib is VERY important in the equation. Nikko seems to be a nice choice for the beginners like me.  And the reservoir is awesome because you don't have to redid your nib all the time. :) The ink I used  on this page is the Speedball ink in Black, but if you are going to order from the site and want to get ink at the same time, the Chinese Sumi Ink is very good. And a very good paper to get if you are interested in practicing is the Rodhia paper pad. You can have it with dots, lines or squares, as you prefer to practice. :) A very nice way to start practicing is by looking at videos on You Tube. Just type Modern calligraphy or oblique pen holder and you'll find plenty. 

VoilĂ !

I hope you learned something new today and that you got inspired. 

Have fun creating!!

Marie

Thursday, February 18, 2016

Hip Kit Club DT - Hello Piff

Hi everyone!

I started playing with my Hip Kit Club February kits yesterday and I had so much fun!! I think that subbing to a kit club is an awesome thing! It makes you use products you would not necessary buy, which makes you get out of your comfort zone and be even more creative to figure out a plan! :) For this little 8x8 page I went real big and used a very dark navy polka dotted background! I thought it fitted perfectly with our late date night and  also with my shirt. ;)


Here are the sketch and the moodboard:


And here are some more details of my page:


Before I started stitching the circles, I traced my lines with a white color pencil. For the bigger circle I used a plate and for the smaller ones I used a stencil... I decided not to erase the lines once I was done stitching. The white line makes a bigger impact on the very busy background than the stitching alone. Before I started stitching, I also placed all my elements on my page (including photo and papers) to see where the embellishments would go on the lines. I adhered them, took away all the elements I didn,t want to stitch down and had the page go through the sewing machine.


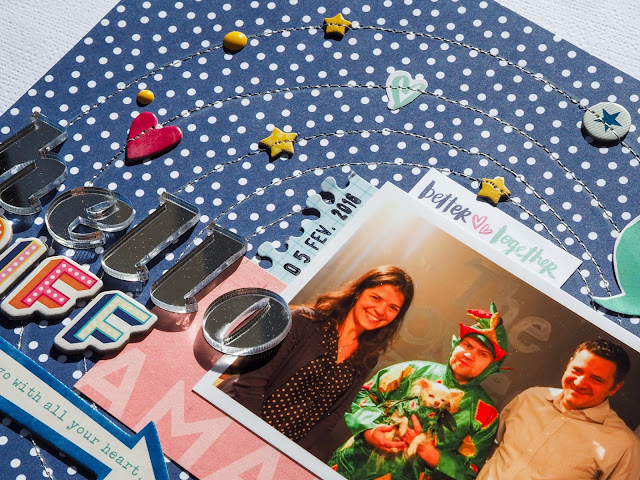
Look at these gorgeous gorgeous letters from Pink Paislee!!! They are acrylic shapes but the bottom is mirror. Because of the reflex I have, not to put my fingers in a mirror, I almost couldn't bring myself to touch them while I was placing them!! lol They are hard to photography but I'm telling you, the impact on the page is stunning. This is definitely a must have!! And in the pack you get some stars and hearts in both silver-ish and gold-ish colors.

And these chipboard letters are so fun as well! They are slightly smaller than many other Thickers I have at home which make them so cute. And the colors are really nice!! I makes a title pop right out the page. Even on a busy background like this one.


These cute little chipboard pieces are from the new Shimelle collection. And the thought bubble is in a sticker book from Amy Tangerine. The thought bubble came from the mood board. I thought it goes really well with Piff's humour.


Some more chipboard pieces from the Shimelle collection. And the little sticker words are from Dear lizzy. I thought the words in this pack are different than the ones we usually see. I was positively surprised. :)


And one last view of the colorful marquee type letters.

Wishing you a nice day and some time to document memories!

Marie